The combination of a hot drink and art go so perfectly together. I always have a hot cup of tea with stream rising in swirls from the top of the mug as I sit down to make some art. I have often used my tea to rinse my watercolor brush by accident (a common mistake amongst many artists) and applied the three second rule to keep right on drinking. So you see, tea and art for me are literally and figuratively in my DNA. I wanted to somehow find a way to incorporate the tea into my art even further. One way is to use your darker teas to paint with, as you would watercolor.
Recently, I stumbled upon the work of Ruby Silvious and became enamored with her adorably hand painted tea bags. It inspired me to try embroidery on tea bags. If you are a tea drinker you may have a collection of different sizes, shapes, and materials of tea bags.
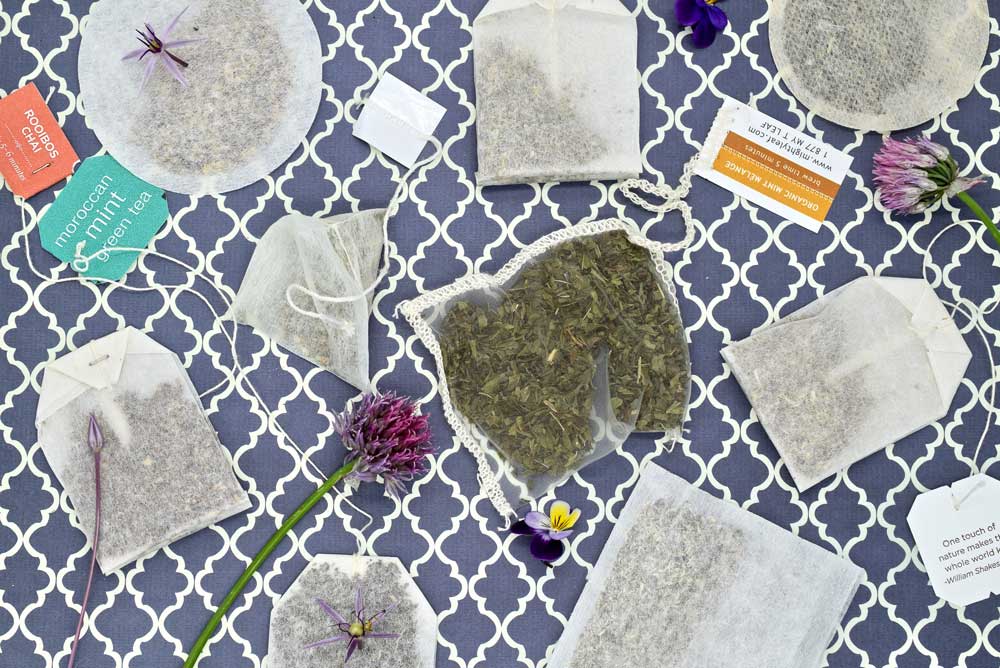
Most often you find that rectangular shape we are all so familiar with that is tied at the top with a piece of string or the string is stapled on but teabags can also be circular, square, and even triangle shaped. Tea bags are most often filter paper material but can sometimes be a more fancy material like the silky mighty leaf brand tea bag in the middle. Isn't that elegant?
I think it's fun to try as many different kinds and shapes of material so at the end you have an interesting collection of shapes and textures which can be framed and hung near your favorite tea spot!
The first step in this process is to remove the tea from inside the tea bag. If you are using a typical shaped tea bag, you can undo the string and/or staple at the top and empty out the leaves using a rectangle shape to embroider. If you have a tea strainer for loose tea, you can save the tea leaves and use them later.
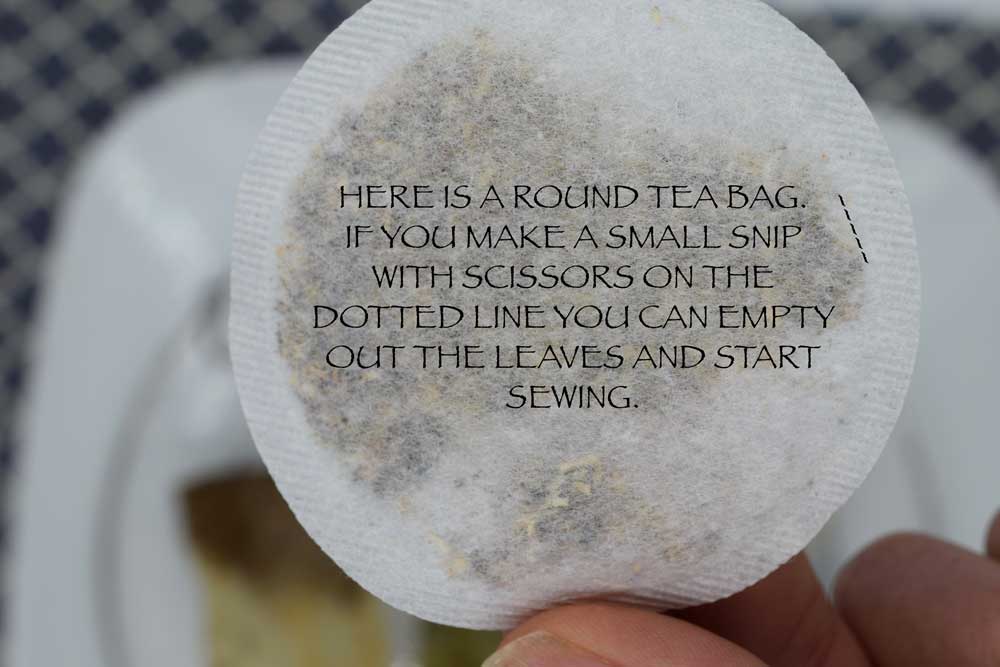
It is easy to make a small incision on the side of the round tea bag if you fold the tea bag in half and make a small snip on the folded line.


Once you make your little snip the tea leaves fall right out. You are ready to start sewing.
That is the easy way. Here is an alternative that requires a little more effort but adds charm, character, and meaning to your project! Make yourself a cup of tea the usual way by steeping the tea bag in boiling water. Drink that delicious cup of tea with a good friend or a great art project. Save that tea bag that has been stained with tea and infused with a good memory and dry it out completely. Unfold and empty that tea bag and you have added a new and meaningful element to your art.

Dry out your used tea bags. I used a drying rack with a plate underneath to catch the drippings.

Once the tea bag is completely dry (mine took two days and I live in a dry climate) you can untie the string and/or undo the staple and open the tea bag to empty the dry tea leaves. I love the staining effect on the bag.
Now gather your sewing supplies:
SIX STRANDED COTTON EMBROIDERY THREAD - I love to use DMC six stranded thread because you can divide the thread to control the thickness. For this project, one to two threads works well since the tea back material is fragile.
SCISSORS FOR THREAD CUTTING
EMBROIDERY NEEDLE - I usually use a size 8 but you can go small with this project since the material is paper-like and delicate and a thicker needle would leave big holes or could tear the paper.
Grab your empty dry tea bag and start sewing! This is a fantastic way to practice your beginner stitches while at the same time making a decorative piece of art.

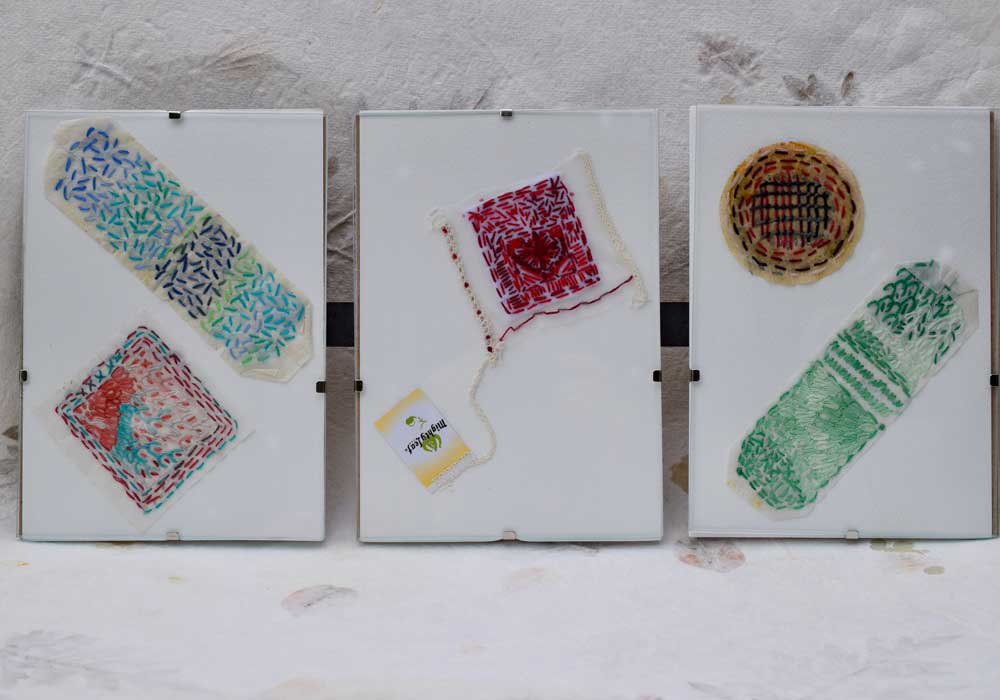
Here is a round tea bag which I used variegated thread to create a RUNNING STITCH around the perimeter and the TRELLIS STITCH in the middle. I love the variegated thread for adding color interest to a very simple piece. I also love the effect of the yellow staining.

In the piece above I did a simple RUNNING STITCH around the edges, some FRENCH KNOTS and the LAZY DAISY STITCH in the bottom right hand corner, the FEATHER STITCH in the top left, and some simple cross and STRAIGHT STITCHES to fill in the V's of the feather stitch. The joy for me in making these was just stitching intuitively and filling in negative space. Put on some good music or a juicy podcast and let your fingers do the talkin'.

Another design in a variegated green.

The mighty leaf tea bag is silky and elegant (and also see through). To deal with the transparency of the tea bag, I cut a small square of white felt and slipped it inside the bag. I used the running stitch to close the side of the bag that I carefully opened with scissors, then used FRENCH KNOTS to accent the perpendicular side for balance. I love the effect of keeping the string and tag attached to the tea bag. I started sewing a LAZY DAISY flower in the center of the small piece of felt and worked my way from the middle to the outer edges just filling in space with whatever stitch came to mind.

You really don't need to get fancy at all. This tea bag was completed in simple SEED STITCH with variegated thread. Totally meditative to just fill the space with simple stitches.
When you are all finished these tea bags look great placed in a simple clear glass frame with a white background to really make the stain on the bags 'pop'.
Carefully arranged on a white background, the tea bags make a nice accent piece and also contain the memory of a fine cup of tea, maybe enjoyed with a favorite friend.
If you want to brush up in your beginner stitches click HERE.
If you would like to practice your beginner stitches, I have a printable sampler available at my shop which includes a pattern and detailed instruction booklet ready to purchase and print from your home computer. Click HERE to find the shop listing for the sampler.

Cheers to summer stitching and tea drinking!!!
Thanks for stopping by!
xox
Pam